Porsche 993 oil change
Listed below are backlinks to another components of the servicing:
1. 60k service routine
2. Spark Plugs
3. oil and all sorts of filters
7. PAS gear check
3. OIL AND ALL FILTERS
The 993 features 2 drain plugs, 2 oil filters (one long plus one short) and you'll deplete off around 9-10 litres then replenish with a comparable quantity, possibly more. The oil container drain plug is ahead of this offside RHS rear wheel behind the wheelarch lining and you may must pull a tiny little the side/sill underbody trim to gain access to it. The lengthy filter goes right here and. The primary crankcase plug is easy adequate to spot off to the LHS for the sump. The short engine filter is found near this but its behind an anti roll bar and also crucially an oil return line so access is bound.
The atmosphere filter and pollen filters are obviously simple to restore as is the gasoline filter. Remember that the gas filter is just allowed to be changed every 60k kilometers. Simply click to jump for this section.
TOOLS
Usually do not attempt the oil filters if you don't have actually both an oil filter glass wrench (76mm with 14 flute as per the laser one at halfords) or a universal 3 legged style tool as offered by machine mart or made by draper. A chain wrench won't cut it because accessibility is limited and you defintely won't be able to get the tool in from the part.
Are you aware that sleep:
10mm plug + ratchet and phillips screwdrivers for the liners, undertrays and trim
15mm socket/spanner when it comes to strain plugs
torque wrench
7mm jubillee video screwdriver or flexible plug setup
container for 10l of old oil
10 litres of Magnatec 10W/40, 2 pollen filers, air filter, gasoline filter, long-and-short oil filters and x2 strain connect sealing rings. I must say I loathe limitless oil debates and I don't want to reproduce any waffle here. Suffice to state that my shortlist arrived down seriously to Silkolene professional S and Castrol Magnatec. The report bits had been OEM but for the oil filters I elected to get the appropriate Porsche products.
The strain plug sealing bands, part quantity 900 123 118 30
Before starting, idle the automobile to get the woman as much as temperature. Make sure that the oil cooler stat has actually established so that the oil cooler outlines get drained also. You'll figure out this whenever oil temp. needle is poiting to 9 o'clock.
To begin with take away the offside backside wheelarch lining (the foward part). You have x2 10mm plastic trim fasteners to remove (i take advantage of a neat little spinner ratchet for these and a-deep plug), one low down right here involving the two material pipes and one higher-up (see pic below).
You might also need 2 phillips screws up high in the arch and then 2 upon underneath.
Peel the arch back to accessibility...
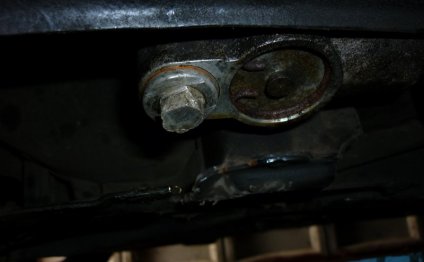
To reveal the long oil filter. The strain plug is straight underneath the filter whilst you can see you want eliminate or fold along the very first the main part sill. Get rid of the 10mm fastener here at the spot.
Then onto 2 philips screws and another a few fasteners more forwards and underneath. Pull down the sill when you're ready. Don't cry when you see exactly how filthy and dirts strewn its under there !
15mm spanner regarding drain bolt, give it a yank and then turn by hand and become prepared pull it obvious. The oil will gush in a huge torrent.
Here is the oil container drain plug. Forget about the O ring, it only gets into the thermostat. You are doing must change the metal closing band though at the mind.
Torque it to 40 lb/ft
Today when it comes to very first filter. This is actually the arrangement we used in combination with the glass wrench, a 3/8" extension and ratchet.
Tap or hammer the wrench securely on then undo.
ensure that the rubberized gasket of this old filter came off because of the filter and isn't left.
Grease the rubberized gasket in the new filter or smear it with a few oil. Screw it in yourself and tighten up manually. Most people leave it at that nevertheless workshop manual does say add-on another extra 1/2 a turn because of the wrench. You do not need it too tight, I included around quarter of a turn simply to be in the safe side.
Obtaining cup wrench off once again can be interesting. A large pair of pipe grips is effective.
Now onto the engine empty connect. Use the motor undertray off by undoing the x5 Dzus fasteners. Do the exact same for the transmisison undertray.
Looking from the straight back for the car to the front side you can see the motor strain plug here from the LHS.
Undo with a 15mm spanner. Catch the oil (nowhere near around at oil tank) then fit this new sealing band.
Torque up. (although the truth is this don't really work also well once the heat excahnger is within the means). If anybody understands a great way to do this after that kindly let me know.
Now onto the quick motor oil filter. Its up in the recesses associated with the vehicle. To gain access to it you will need to get rid of the longer part of red/brown vent hose pipe and remove you will initially need certainly to eliminate the short area combined with the metal home heating flap (the piece that looks like the termination of a vacuum solution).
Undo both clips such as the pic above.
The undo one other end of the longer air flow hose. You can observe the filter here behind it.
Thereupon little lot out it's simple to visit your target.
Now with a cup wrench you'll be able to slip it in position. There is the oil return pipeline here in the manner you could roll the glass on the filter from its North to Southern advantage (presuming North is to the front side for the car). Angle it throughout the north edge after that move it to the straight back of this automobile. You may need to hammer somewhat here and there nonetheless it should ultimately clear the steel pipeline and then you can hammer it on the filter.
Undo and stay ready for a mess. Allow the oil to dribble throughout the subframe and anti roll club etc.. After that unscrew it completely and guide it through offside space.
INTERESTING VIDEO
Share this Post
Related posts
Porsche 993 engine
993 Air Injection Port Plug Block Off Set - (1995-1998) PORSCHE 993 / Turbo 3.6L DME Engines - SAI (Secondary Air Injection)…
Read More
Porsche 993 Parts
How exactly to substitute your V- gear Changes produced by Robin on Summer, 2 including pictures. Difficulty scale (10 being…
Read Morelatest post
-
 Electric Porsche 356 July 10, 2026
 -
 1998 Porsche 993 C2S for sale July 5, 2026
 -
 Denver Porsche dealership June 30, 2026
 -
 Porsche Design Aviators June 25, 2026
 -
 Porsche Cayman Dimensions June 20, 2026
 -
 Silver Porsche Boxster June 15, 2026
 -
 Porsche Cayman facelift June 10, 2026
 -
 Porsche Panamera s for sale June 5, 2026
 -
 Porsche Panamera Wiki May 31, 2026